×

工业设计互动平台

手机短信,快捷登录

QQ登录

只需一步,快速开始

Rhino枕头建模教程——中英文双语[转]

发布于 2012-6-15 102 点赞 293 评论 123721 浏览

刚在问题求助区看到有筒子求助怎么做,偶这里贴出偶之前看过的一份教程供大家参考。

===============偶是正文分割线===========================
翻译:Ashur  
原贴地址:  http://www.flyingarchitecture.co ... llow-in-rhinoceros/
====================================================

pillow_tut_1.jpg pillow_tut_2.jpg
Hello!
(Thanks to Toby Humphrey for making some corrections in my grammar and making this tutorial readable)
It’s me again, Matus. Several people have asked me how to model a pillow in Rhinoceros, which I have been using in some of my scenes. Instead of just sharing this model I am going to show you how to do it! Here is the final product:
多谢Tby Humphrey制作了一些语法修正,让我的教程更加具有阅读性
又是我Matus^^ 很多朋友问道我如何用Rhino制作枕头,尤其是某些我在自己的场景中用到的
与直接分享模型不同的是,我打算教会大家如何制作:) 首先登场的是最终结果
40.jpg
This tutorial is going to be very quick, the whole modelling process took me approximately 10 minutes. This model was done in Rhinoceros 5 WIP, so you can see me using Gumball tool, which is not included in Rhinoceros 4. (but you can download it for Rhinoceros 4 as a plugin from official McNeel website, or use the one from T-Splines toolbar, if you have it.)
Okay, let’s begin: First of all, we need to make a square, 400×400mm and explode it:
这个教程会速度比较快,整个建模过程花了我大概10分钟时间,这个模型完成于Rhino5测试版,所以你会看到我使用Gumball命令(回头我也得看看这是啥命令)这个在4里面你们是找不到滴,但是你可以下载它对于Rhino4的独立插件,在官方的Mcneel网站上,或者使用Tslpine工具
Okay 开始吧,首先 我们要制作一个400×400mm 的区域
01.jpg
Press Ctrl+A to select all of these 4 lines, type the Rebuild command and press Enter. Set the ‘Point count’ from 2 to 10 and the ‘degree’ from 1 to 3 (the degree number 3 will make curves from our simple lines). You can always click the image below to see a full resolution screenshot.
Ctrl+A全选四条线,重建,让重建点数从2升高到10,并将桔树提高到3(3阶曲线来自我们制作的简单直线的升阶)你可以在下图中看到操作界面的截图
02.jpg
Select all the curves and press the F10 button to show the control points. Select the ‘top view’ and drag the corner points a little bit inside the square, creating filleted corners.
选择所有的曲线,然后按F10显示控制点,选择俯视图TOP然后将控制点稍微向内来一点,制作一个拐角
03.jpg
Now drag all the other control points in and out of the square, so they will be placed randomly. This forms basic frame for upholstery surfaces.
然后图哦转其它的控制点 也想内部来一点,最好让这些点随机排布,显得自然些,这些造型是生成曲面的关键控制
04.jpg
Duplicate these curves and move them up vertically by 75 mm.
复制粘贴这根线 然后向上移动75mm
05.jpg
Hide the original curves, so you can see only the duplicated ones. Again show the control points (from the menu, toolbar, or by pressing F10).
隐藏原始曲线,留下复制出来的这根,再一次打开控制点
06.jpg
Now the INSERT KNOT command: It is not necessary to rebuild the entire curve with 20 or 50 control points to make it super-detailed. All you need is to insert some knots close to the places where you need your curves to be more detailed.
然后插入KNOT点,命令栏输入_insert knot,现在没必要再重建升到20点或者50点来制作细节了,你需要做的就是插入一些Knot点,在你需要制作细节的位置
07.jpg
And this is it. Make some deviations on these curves. Remember we are still in the 2D ‘top view’!
搞定,拉点再制作一些细节变化,记住啦 我们还是仅仅在二维空间的俯视图中进行的操作

本帖隐藏的内容
08.jpg
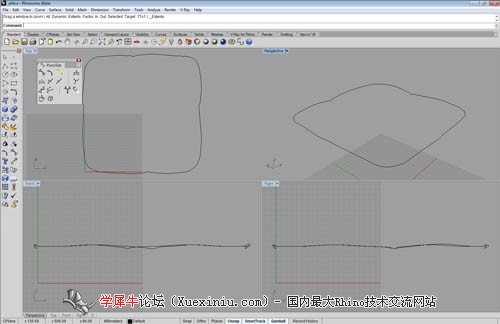
Now for some more fun. Switch to the ‘perspective view’ and make some new deviations in the UP/DOWN direction where required.
现在来点搞笑的,进入透视图,让控制点有一些上下的变化,当然了 在你需要的地方:)
09.jpg
Do the same with original curves, which have been hidden until now.
然后反隐藏之前的曲线,重复上面的操作
10.jpg
The corner control points on the lower curves must move up and the corner control points on the upper curves must move down!
这句 不知道咋翻了。。。囧下。。。意思就是拐角的控制带你需要低一点 ><
11.jpg
Create a line (length 150mm) and move it vertically up by 50 mm.
制作一根直线 长度150mm 并把它垂直提升50mm
12.jpg
Rebuild the curve, just as in the picture (click on the small picture to see a full resolution version).
重建这根曲线,像图中展示的这样(编者按:个人估计重建个3接10点吧)
13.jpg
Drag the control points up and down to make them look more random.
然后把这些控制点上下随即调整下
14.jpg
Make 4 new lines connecting the corners of curved squares with endpoints of the new curve:
然后再制作4根链接拐角和这根新建线条的曲线
15.jpg
Explode these lines (just in case you drew polylines) and rebuild them:
制作这些先的细节,就像你在画多段线一样,并重建他们

16.jpg


Select these lines again, show the control points and adjust their position, again in the up/down direction.
呃。。。这步不是做过了么。。。
打开控制点,让这些点上下随即排布
17.jpg
This is now how it should appear in Rhino:
这就是它们该张的样子
18.jpg
Okay, now for some more new curves…Use the ‘polyline’ tool to connect the middle points of the last four curves.
然后我们需要一些新的曲线,使用Polyline工具,将刚才的四根线条通过中点连接起来
19.jpg
The explode & rebuild:
然后炸开重建
20.jpg
Show the control points again and adjust their position:
再次打开控制点,并校正他们的位置
21.jpg
Now for the surfaces:
Okay, now that we are done with the boring stuff let’s work on the actual 3D surfaces. Keep in mind one important rule: DO NOT JOIN SURFACES! Okay, select the curves as you see in the picture and then select the ‘curve network’ option from the ‘surfaces’ menu.
然后生成面
Okay,结束了让人枯燥的想死的调点工作,记住一点重要原则,先别Join(连接)曲面,然后选中曲线,像图中这样,使用network命令
这个命令在曲面工具列里面
22.jpg
Click ‘okay’ in pop up window and you have your first surface complete. Nice, isn’t it?
点击OK 你就会看到生成的曲面 很棒 对吧 PS: - -|||
23.jpg
Repeat the same for the rest of these curves, resulting in the upper part of the pillow:
重复刚才的操作,把剩下的曲面建立起来
24.jpg
Select all the surfaces in the model and uncheck the box called ‘show surface isocurves’ leaving you with clean organic surfaces with no additional isocurves.
选择模型中的所有曲面,然后再属性查看栏里面关闭显示曲面ISO,按F3可以看到曲面属性对话框,这样你就可以看到一个简洁的面了,再也没有那些烦人的ISO线在你眼前晃来晃去
25.jpg
Select the border curves for lower part of the pillow and create a surface as we did previously.
翻译累了,休息一下 先发上来吧       休息完毕 然后制作下面的曲面 方法同上
26.jpg
Create layers and organise the scene items into them.
建立一个图层把这些东西放进图层里
27.jpg
So this is where we are now:
这是现在的状态
28.jpg
Hide all the surfaces, so that only the curves are visible. Make some additional curves, as shown in the picture:
隐藏所有的曲面,只保留曲线可见,把之前的线如下图处理下
29.jpg
Once again rebuild them:
再次重建
30.jpg
Adjust their position (using the control points).
调点
31.jpg
Create some interesting geometry:
建立一些有意思的形态
32.jpg
And that’s it for the curve adjustments.
这个是一些曲线细节的调整
33.jpg
Create a new surface in the same way as before, by selecting the ‘curve network’ option from the ‘surfaces’ menu.
然后建立一个新的曲面,像上面的方法那样,就是network命令
34.jpg
Do the same with the other curves.
曲线也做相同的操作
35.jpg
So now we’ve got it! The surfaces are finished. Categorise them into layers.
现在,我们得到了目标曲面,把它们放进相应的图层里
36.jpg
Show all the surfaces and hide all the curves. Now we have an almost completed pillow.
然后显示出所有的曲面,刚才隐藏的,现在我们已经差不多完成了这个枕头
37.jpg
Great, now for the final part: The piping.
Select the border curves, join them and use command ‘pipe’ to create a pipe running along their length using a radius of 1.5mm.
最后一部分:生成管子
选中所有的曲线,结合起来,然后用TS3的张管子命令一下搞定 如果用Rhino的管道也可以 半径1.5
38.jpg
On the other curves, use ‘no cap’ option, so you have only surfaces (not polysurfaces). Use radius of 1.2mm.
老外用的是rhino的管道命令
39.jpg
Finally, we have completed all the modelling!
最后我们把这些管自也搞定了
40.jpg

=========================================
跟贴贴作业有大洋。。。。
[s:76][s:76][s:76]
参与人数 9大洋 +33 收起 理由
lz7412388 + 1 很给力!
陈素宾 + 3 很给力!
rt15e616 + 1 赞一个!
围巾 + 3 很给力!
爱好阿岚 + 10 很给力!
寂ぜ寞 + 1 很给力!
810816198 + 3 赞一个!
布噜布噜 + 1 神教程
大钊 + 10 乌龙发帖不&amp;quot;乌龙&amp;quot;啊

查看全部评分

本帖被以下淘专辑推荐:

  • · 游艇|主题: 13, 订阅: 10

点评

Oyangsl.. · 发表于 2020-12-22 18:31 评论

牛啊牛

您需要登录后才可以回帖 登录 | 立即注册

本版积分规则

精彩回复

文明上网理性发言、请文明用语

覃滴滴· | 资深设计师 | 发表于 2021-4-12 09:28:47
这个....我以前看帖基本不回帖,后来我发现,这样不但会花掉我的金币,而且不厚道。于是我把这段文字保存在记事本里,每看一个帖子,就复制上去,以表达我对楼主的谢意,把帖子顶起来,顺便帮自己挣点金钱。学习中,谢谢
3 回复

举报

app800 | 实习生 | 发表于 2018-5-27 09:49:34
赞一下


          55-sunbet.com 99sunbett.com 55sunbett.com star288.net 037suncity.com  031suncity.com suncity117.com  suncity224.com 359sunbet.com 169sunbet.com  675sunbet.com  683sunbrt.com 756sunbet.com  sunbet367.com 04mscc.com
haofu58.com  11sunbet.com 29haofu.com haofu173.com
1 回复

举报

杨先生 | 实习生 | 发表于 2012-6-15 16:04:13
好好的学了一下,谢了!
1 回复

举报

寂寞的空气 | 实习生 | 发表于 2012-6-15 08:12:23
[s:167]抢个沙发坐一坐
0 回复

举报

shenlong20122 | 实习生 | 发表于 2012-6-15 08:22:38
曲面向来都是很不好做的
0 回复

举报

高山 | 实习生 | 发表于 2012-6-15 09:50:21
我靠,经典教材
0 回复

举报

carrot | 官方管理团队 | 发表于 2012-6-15 10:33:16
不错!老外的东西 都很细致!!包裹教程
0 回复

举报

▎Parson、 | 实习生 | 发表于 2012-6-15 12:56:11
好东西啊~               
0 回复

举报

郭玉花 | 实习生 | 发表于 2012-6-15 14:05:12
做的褶皱不是很多,大体就这样吧
untitled.207.jpg
0 回复

举报

参与人数 1大洋 +10 收起 理由
乌龙 + 10 迟到的大洋…………

查看全部评分

默然 | 实习生 | 发表于 2012-6-15 15:19:04
学习了啊………………
0 回复

举报

xiekai39 | 实习生 | 发表于 2012-6-15 18:13:04
又学到东西了,还得大洋。霍霍霍霍
0 回复

举报

余凯 | 设计助理 | 发表于 2012-6-15 20:05:45
收藏学习
0 回复

举报

『幕名』 | 实习生 | 发表于 2012-6-15 20:27:49
[s:189] 好东东  简单明了 了
0 回复

举报

xander_527 | 实习生 | 发表于 2012-6-16 00:09:23
描描~~~~
0 回复

举报

rx78rxf91 | 设计师 | 发表于 2012-6-16 00:26:21
很久以前做過,老實說..如果你有TS用的話..用這個方法實在很沒效率
0 回复

举报

451371225 | 设计助理 | 发表于 2012-6-16 00:32:29
相当 不错  赞个
0 回复

举报

乌龙 | 设计总监 | 发表于 2012-6-16 04:53:04
rx78rxf91 发表于 2012-6-16 00:26  很久以前做過,老實說..如果你有TS用的話..用這個方法實在很沒效率

期盼TS版教程中
0 回复

举报

10086xx · 发表于 2019-5-7 16:17 点评

始终没看到用Gumball命令

rao6241 | 设计助理 | 发表于 2012-6-16 08:52:26
[s:188][s:188]
0 回复

举报

Michaelinps | 实习生 | 发表于 2012-6-16 09:17:35
[s:135][s:192][s:191]
0 回复

举报

当你、遇上我 | 实习生 | 发表于 2012-6-16 09:42:27
xinkule                  
0 回复

举报

林广朋 | 实习生 | 发表于 2012-6-16 11:01:38
强呀,学习了!楼主很用心呀!
0 回复

举报

引花公子 · 发表于 2012-10-12 11:13 点评

做是做了,但是线条拉的时候没啥感觉,第一次做枕头,求过……

乌龙 | 设计总监 | 发表于 2012-6-16 11:11:25
当你、遇上我 发表于 2012-6-16 09:42  xinkule

这个翻译并不是我做的,我也不会做。我只是转了贴
0 回复

举报

douzidou | 实习生 | 发表于 2012-6-16 11:21:19
lz做的东东很棒,以前没有尝试过,今天学习了一下,很有感觉,谢谢LZ分享……
0 回复

举报

我的等待 | 实习生 | 发表于 2012-6-16 12:12:27
学习了![s:179]
0 回复

举报

天蓝火焰 | 实习生 | 发表于 2012-6-16 16:39:56
很好。。。。。。。[s:190][s:190][s:189][s:189][s:188][s:188]
0 回复

举报

许愿树 | 实习生 | 发表于 2012-6-16 17:21:08
还行
!!!!!
0 回复

举报

xiekai39 | 实习生 | 发表于 2012-6-16 19:44:16
大神[s:40]
0 回复

举报

张娜 | 设计助理 | 发表于 2012-6-17 02:24:36
挺好的!学习了哦!谢谢呀![s:192]
0 回复

举报

younvjiujiu | 实习生 | 发表于 2012-6-17 23:33:03
[s:189]看看就开眼界
0 回复

举报

锅小尘 | 实习生 | 发表于 2012-6-18 08:58:09
受教了
[s:135]
0 回复

举报

sundianaidd | 实习生 | 发表于 2012-6-19 18:47:38
果断收藏下,,,好好学习[s:136]
0 回复

举报

zyh99459 · 发表于 2022-3-14 13:33 点评

学习了,太可以了

推荐学习